


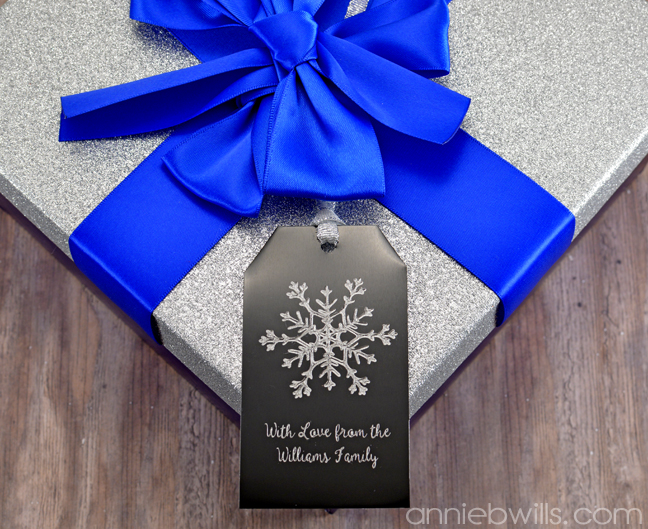
I have been desperate to try out metal etching since I first got my Silhouette Curio and just never found the time. Yesterday, I finally sat down with a pack of metal etching sheets and spent the entire day creating some some gorgeous panels for three different projects. These shiny Christmas gift tags were my favorite!

I started by resizing three holiday images from the Silhouette Design Store (listed below) to fit on a tag approximately two inches in width and then added my custom text. To prepare your designs for etching, you’ll first need to hook your Curio up to your computer and open the Design Page Settings Menu (arrow 1). Then, enter the dimensions of your media (7″ x 5″ for metal etching sheets) and change the cutting mat to the 8.5″ x 6″ Curio Cutting Mat (arrow 3).

You’ll next apply an “emboss effect” to your designs…otherwise only the outline of each will be etched. Open the Emboss Menu (arrow 1), click on Emboss/Deboss (arrow 2), and select an effect (arrow 3). I chose “Concentric” to fill in my images and lowered the spacing (arrow 4) as low as it would go to get the most amount of fill possible (0.004 inches).

When you open the Cut Settings Menu (arrow 1), you’ll notice that you need to select which tool slot you’ll be using in the Curio’s dual carriage. Click on “Tool 1” (arrow 2) and select “Metal Etching Sheet” as your material type (arrow 3). The software will tell you the appropriate platform configuration to use with your material (arrow 4).
In this case, I used two 2mm platforms and the Curio Embossing Mat under my metal etching sheet. Click “Send to Silhouette” once you have loaded the base into the machine and have placed the Curio Etching Tool into the appropriate slot.

I used one black metal etching sheet to create all three tags at once. When the Curio had finished etching, I simply cut them apart with a guillotine paper trimmer (you may need to manhandle it, but my Martha Stewart trimmer worked just fine), snipped the top corners off with an ordinary pair of scissors, and punched a hole in them with a Crop-A-Dile.

I was amazed at how much detail I could achieve with the metal etching tool in my Curio. It’s such an elegant and impressive look and takes hardly any time at all to set up (run time is another story…be prepared to set it and walk away for while if your design is very large or detailed!).

Naturally, the best part is being able to customize a greeting like this one. And the sparkly and shiny effect is perfect for wintry snowflakes!
I hope I’ve inspired you to take a closer look at some unexpected materials for your gift tags…or to finally break out that Curio you might have collecting dust. Be sure to stop back tomorrow and Saturday for more last-minute gift tag ideas (and maybe even a freebie 😉 ).
Designs Used:
These are so cute!! Thanks for the clear steps that you’ve given! Did you use silhouette brand’s metal etching sheets? I just got my curio and have been trying to do some research as to what would be the best metal sheets to use. I’ve read that the SIL brand is very thin and bends easily as you take it off the mat.
Thank you Leslie! I did use Silhouette brand etching sheets…they are pretty durable and I had no problem with bending when I removed them from my mat. You might be thinking of the stippling sheets? Those are much thinner and you need to be careful with them. I haven’t found any other affordable options for etching yet to use in place of Silhouette’s sheets, but will be sure to post about it if I do!
I’m so glad I ran across your blog. Thank you for taking the time to teach us how to use these machines! I got both the Mint and the Curio on black Friday and just opened the Mint today and I love it! I can’t wait to start using the Curio soon. My question on this is; why did you take it off to cut it rather than do a cut with the curio? can the blade not cut that material? I had hoped that I could etch something and then cut the shape with less handling. Also, have you tried to do anything with flashing that you can buy cheap at the hardware store?
Oh, you’re going to love your new Mint and Curio! Unfortunately, the blade cannot cut through the metal etching sheets, so you’ll have to manipulate the material by hand if you want to trim or pierce it. I have not tried metal flashing yet…the hardware store was my next stop! Also, if you google something like “engraving plates” or “coated aluminum”, you might be able to find pre-cut shapes that you can etch…warning – I haven’t tried any myself yet! But I will be sure to post when I find other materials you can etch with Curio.
This is awesome! I keep getting a mirrored image. How do I adjust that setting?
Never mind I figured it out. Thanks so much for this tutorial!
Oh great, I’m glad you figured it out Karianne! My guess would have been that you had the “Emboss” button clicked instead of “Deboss”.