


I learned last year when I made this Meal Planning Chalkboard that if I make a point to schedule it beforehand, I’m more likely to stick with something like eating healthy. This year, my goal is to add a little more exercise to my routine. I subscribe to the theory of 80% compliance (I just don’t have the time or energy to stress over more than that), but currently I’m running at about 40-50%. So, I’m hoping this new workout calendar I created using a magnetic dry erase board (you can find these at office supply stores or Walmart), adhesive vinyl, and Silhouette Printable Magnetic Paper will help me get closer to my goal.
I’ve got big plans for longer hikes and maybe even some backpacking this year, so I can’t afford to let myself get lazy right now during this very cold winter! If fitness isn’t your goal, though, this project could easily be adapted to plan meals, activities, or just your life in general because the Online Store has tons of icons for every type of activity you can think of.

I started by cutting the calendar design out of matte black vinyl. Because I wanted my calendar border to be as close to 12″ x 12″ as possible without having to piece two sections together, I placed my vinyl on my mat for cutting. I also left the vinyl on the mat while I weeded so that it would lay flat while I worked.

Next, I transferred the vinyl calendar to a magnetic dry erase board using transfer paper. The dry erase board was a good choice for me because it makes it easy to change the dates for each new month and add any additional daily details.
![]()
To create my printed workout magnets, I started by opening up several fitness icon designs from the Online Store and filling them with bright colors. First, open the Fill Color menu (arrow 1) and click on one of your icons (arrow 2). Then, choose a color to fill the shape from the Basic Options box (arrow 3) or open the Advanced Options for even more color options.
![]()
I made several copies of each icon so that I would have plenty to fill my monthly calendar. A quick way to do this is to open the Replicate Menu (arrow 1), select your shapes, type the number of copies you would like in the Number box under Advanced Options (arrow 2), select where you would like the copies placed (arrow 3), and click Replicate (arrow 4).
![]()
To fit all of my icons within the printable area of one sheet of magnet paper, I opened the Nesting Menu (arrow 1), selected all of my designs, and clicked on Nest (arrow 2) after adjusting the options to my liking. Then, I sent my page to my printer.

Once printed, your magnets will look something like this. Stick your magnet paper to your cutting mat, insert the mat into your Silhouette, and send the same page (don’t change anything!) to your machine. You’ll notice that I also added the free January design to my page before printing. To make similar “month” designs for the rest of the year, follow the instructions below.

I didn’t have a font exactly like the one in the free design, so I chose one with the same modern look – the RR Merry & Bright Font. First, open the Text Style menu (arrow 1), select your font (arrow 2), and type the name of your month. Then, you can adjust settings like the Character Spacing (arrow 3) to look more like the free design.

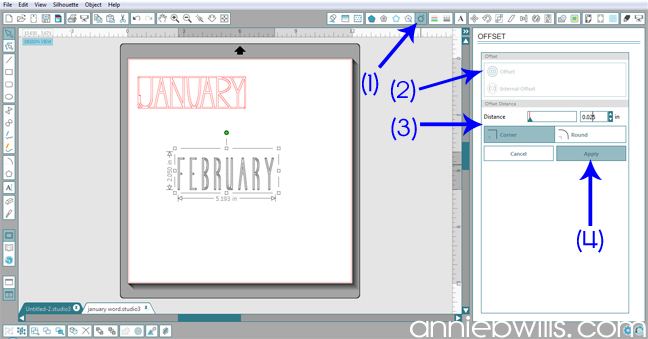
My font was a fairly thin one, so I added some artificial bold-facing using the Offset Menu (arrow 1). Select your word, click on Offset (arrow 2), change your distance setting (arrow 3) until you have your desired thickness, and click Apply (arrow 4).

Delete the original word and keep your offset only. To create the rectangular border, click on the Rounded Rectangle Tool (arrow 1) and draw a rectangle that touches your word on all sides. You can adjust the curve of the corners using the red control points (arrow 2)…to adjust both points at the same time, simply hold down the Shift key while moving one of them.

Create an offset of this rounded rectangle using the Offset Tool (arrow 1). Click on Offset (arrow 2), select you desired distance and “round” to keep the corners rounded (arrow 3), and click Apply (arrow 4).

In order to weld the shape properly, you will need to create a compound path out of the two rectangles you just created. Select both rounded rectangles (arrow 1), right click on your mouse, and click on Make Compound Path (arrow 2).

Now select your double rectangle border and letters (arrow 1) and click on Weld (arrow 3) in the Modify Menu (arrow 2).

Once welded, you can fill your new design with any color (arrow 2) using the Fill Color Menu (arrow 1) and print and cut from magnet paper as above.

My fitness magnets are less than 1″ wide and the detail of the each cut is just amazing! And I have plenty of tiny magnets to plan out workouts for an entire month.

With tons of designs in the Online Store, you can customize your calendar for whatever part of your life that might need organizing. How are you using your Silhouette to keep your New Years’ resolutions?
Designs Used: