


Looking for a way to beat the late winter blues? Let’s break out the bright colors and shiny metallics and create a fun springtime hello card! I don’t really send cards out for St. Patrick’s Day, but I love any reason to celebrate so why not say hello to a friend with lots of spring greens and a fun leprechaun image?

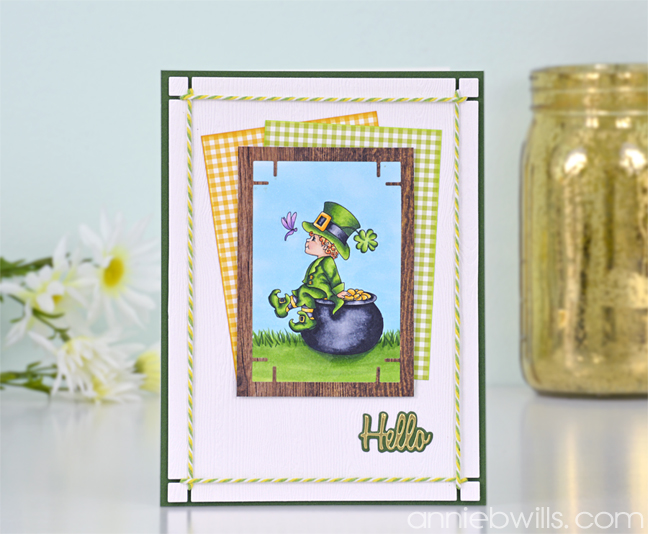
I started by printing this cute digital stamp onto Curious Metallic Cryogen White Cardstock and coloring the image with Copic markers. Alcohol markers blend beautifully on this cardstock and there is a subtle shimmer that shines through the ink when you’ve finished (which is unfortunately difficult to photograph, but pure magic in person).

Next, cut some patterned paper to 3″ x 4.25″. To create a frame for my image, I die-cut the center out of a dark woodgrain patterned paper cut to the same size using these unique Notched Corner Layers from The Stamp Doctor. These dies are meant to be used to create mat layers that you can easily wrap twine or ribbon around for lots of texture and dimension (we’ll get to that later), but I thought they made great frame cutouts too.

When I’m not matting my patterned paper panels, I like to lightly ink the edges of them with a similar color. This makes them look just a bit more polished on the final card.

The largest die from the Notched Corner Layers set is sized for an A2 card and I wanted to make it larger, so I first trimmed a piece of Savanna White Limba Woodgrain Cardstock to about 5.5″ x 7.5″. Then, I partially die-cut one side of this panel with the die turned sideways, stopping just short of the other edge of the die as shown.

Repeat this process on the other side of the panel and use scissors to connect the two cuts. This will leave you with a card front that is almost double the size of the die (about 5.25″ x 7.25″).

Wrap some bright twine or ribbon around the woodgrain panel (here I’m using some lemon-lime baker’s twine from my stash). Secure the ends on the back with a bit of washi tape…you could also tie a bow on the front or a knot at the back!

Die-cut the hello sentiment from the Lovely Lattice Die Set from Gold Bright Foil Cardstock and the shadow layer from Curious Metallic Botanic Cardstock. Trim a card front mat (5.5″ x 7.5″) from Curious Metallic Botanic Cardstock and a piece of Neenah Classic Crest Solar White Cardstock (110 lb) to 7.5″ x 11″, scoring down the center to create a card base.

Place the Curious Metallic Botanic mat directly onto the card base with tape runner, add foam tabs to the twine-wrapped panel and adhere on top, and then arrange the patterned paper panels in the top center of the card front.

Add your framed, colored image to the card with foam tabs and adhere the matted sentiment to the lower right corner with liquid glue.

I hope you enjoyed this bright and cheery springtime card project and thanks so much for stopping by today. You can visit the CutCardStock store to purchase many of the supplies showcased today and if you like this project, please leave a comment below!
Use the code anniebwills to save 10% on any regularly-priced items at The Stamp Doctor!
Supplies Used:
Note: This post contains affiliate links. This means that I receive a small commission if you purchase a product through some of the links in this post or below at no additional cost to you. Thank you for helping to support this blog!


Little Leprechaun A2 Notched Corner Layers Lovely Lattice Dies White Woodgrain Card


Annie, thanks for joining in our Whimsy Stamps St Patrick’s Day event with your gorgeous creation. You’ve won! Head on over to the Whimsy Stamps Facebook page, grab your winner’s badge and contact Denise (details on FB post) to claim your prize. Hugs, Wends xoxo Whimsy Stamps DT
How exciting! Thanks so much Wendy…I loved coloring this little guy!